Pattern Updates
Page 5 Chicken
BLACK #1
(1)1 7/8” square
(3) 1 ½” squares
WHITE#1
(1) 1 ½” x 4 ½” rectangles beak
(1)1 7/8” square HST tail/comb
(2) 1 ½” squares
Page 8 Cat
ASSORTED PINKS
(16) 1 ½” squares
PINK #2
(3) 1 ½” squares
Page 6 Flying Geese
BLACK #1
cut 8 instead of 4 2 1/2″ squares
TEAL #6
cut 2 instead of 1 2 1/2″ x 4 1/2″ rectangles
Page 8 Dog
WHITE #1
(2) 2 ½” x 1 ½” rectangles
WHITE #1
(2) 1 ½” x 2 ½” rectangle
(1) 1 ½” sqaures
Cutting
FROM EACH OF 20 FAT QUARTERS
(4) 2 1/2″ x 4 1/2″ rectangles – change B to D
(12) 2 1/2″ squares – (C, E and B)
Large
BACKGROUND DIAMOND FABRICS
Cut 56 pink rectangles 4 3/4″ x 7″ “
Cut 56 white rectangles 4 3/4″ x 7″
Small
BACKGROUND DIAMOND FABRICS
Cut 30 pink rectangles 4 3/4″ x 7″
Cut 30 white rectangles 4 3/4″ x 7″
Medium
BACKGROUND DIAMOND FABRICS
Cut 42 pink rectangles 4 3/4″ x 7″
Cut 42 white rectangles 4 3/4″ x 7″
Page 1
CUTTING INSTRUCTIONS FOR CHICKEN
Cut 2 (18) rectangles 2 1/2″ x 6 1/2″ white fabric
Page 2
CUTTING INSTRUCTIONS FOR BLACK AND WHITE SASHING
Add Cut 6 strips 2 1/2″ x 10 1/2″ white
BORDER 3
Cut into 2 strips 4 1/2″ x 66 1/2″ and 4 1/2″ x 72 1/2″
Enlargement
Please enlarge this pattern 200% (instead of 50% as indicated on pattern)
Page 1
3″ – 4″ Block
- Use any 3 ½” – 4 ½” unfinished pieced or embroidered block to insert on the pouch outside. Do this for one side or both sides. We used our Stamp and Stitch and embroidered a 5” block. Trim block to 4 ½”. Note: the block size does not matter because you can sew as many strips around the block to complete the pouch outside.
Zipper
- 10″ for small pouch
- 12″ for medium pouch
- 14″ for large pouch
Binding Strip for Zipper and Seams
Use precut 2 ½” x WOF strips for binding. Use 2 ½” x 2 ½” for zipper ends.
Page 2
Page 2 Stitch ½”, should say stitch ¼”
C / D Cut 4 strips 4 1/4″ x WOF. Cut 32 squares 4 1/4″ x 4 1/4″ instead of 5 3/8″ x 5 3/8″. These will make 64 half square triangles.
E Cut 5 strips not (10) 5 3/8″ x WOF. Cut 32 squares 5 3/8″ x 5 3/8″ cut diagonally 2x to make 128 QST’s.
Back Cover Update
Requirements
Intermediate skill level
- 1 fat quarter bundle (21 fat quarters)
- 35⁄8 yards background fabric (pink or mint)
- 21⁄8 yards (no seams) or 1 yard (with seams) border fabric 2⁄3 yard binding fabric
- 45⁄8 yards backing fabric
- 80 ̋ × 80 ̋ batting
b= In the yellow section, it states to cut 4 3/4 x 2”
b=In the Pink section it states to cut 4 3/4 x 2 1/2” change to 4 ¾ x 2”
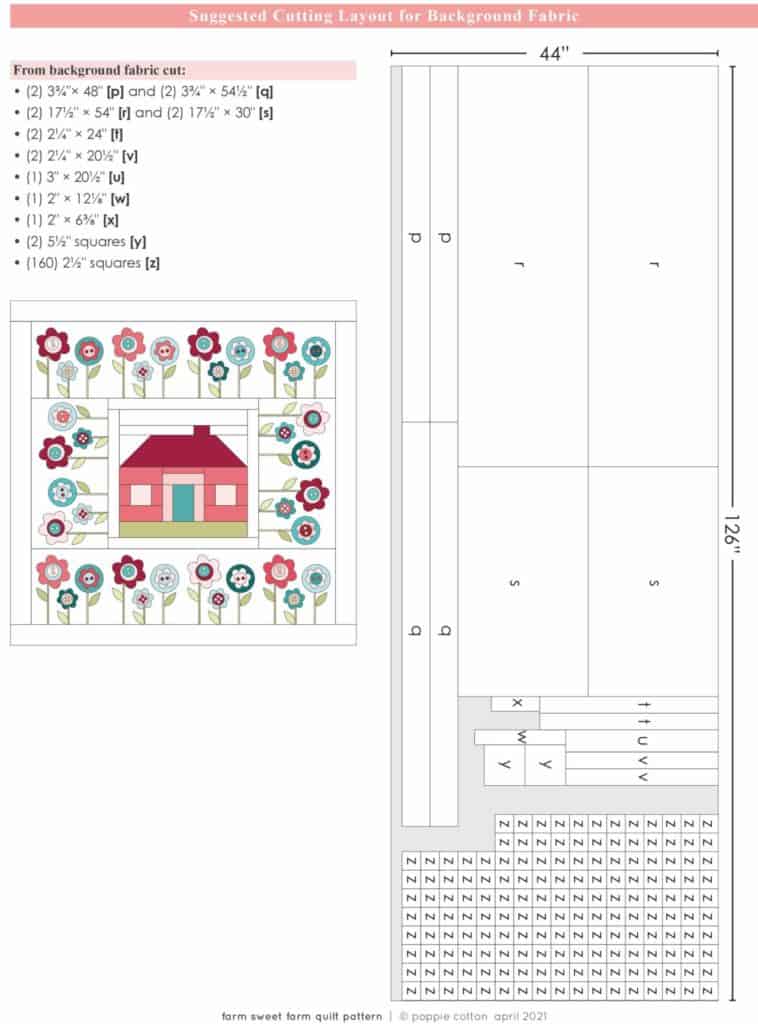
This is the cutting layout with a perfect 22″x18″ FQ. There is no margin for error. If you fall short of fabric please use the other blue left overs to cut out the background of the smaller star.
Page 2
Rising Star
[a] should be 3″ squares
[e] should be 5-1/2″ squares
[f] should be 5 1/2″ x 10 1/2″ rectangles
Page 6 – Green Pinwheel Star
Green is [a]
Pink is [b]
Page 8 – Log Cabin
Blue #3 is 5-1/2″, not 51-1/2″
Page 8 – Yellow Star
Trim a/e HST to 2-1/2″
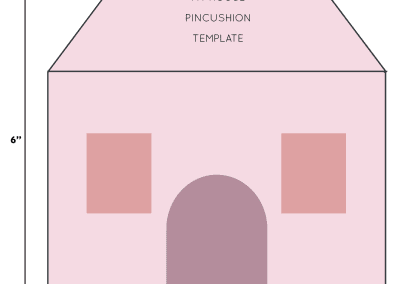
Please make sure templates are printed to scale.
Should be Green 3-3/8″ squares and Pink 3″ squares
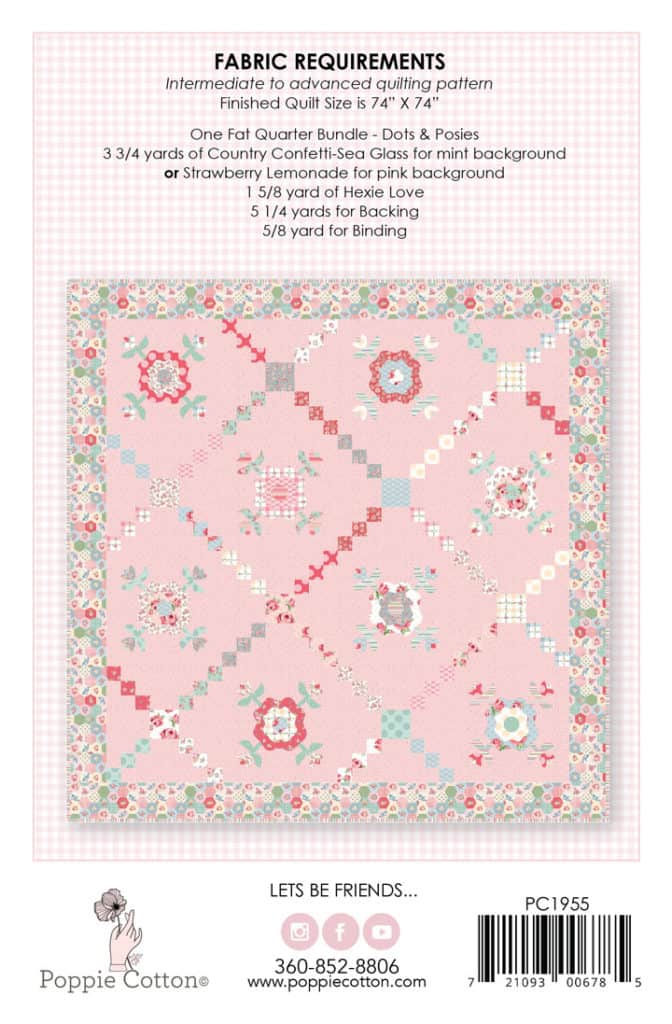
Requirements
Intermediate skill level
- 1 fat quarter bundle (27 fat quarters)
- 1 fat quarter EACH of Country Confetti light pink, blue, yellow, red, and white
- 1 yard pink for inner borders
- 3 1⁄2 yards background fabric (Country Confetti white)
- 4 2⁄3 yards backing fabric
- 2⁄3 yard binding fabric
- 75 ̋ × 75 ̋ batting
Barn
(2) 6″ × 3¼” [a]
(2) 8½” × 1¾” [b]
(4) 2¾” × 5½” [c]
Door
(2) 3″ × 2¼” [d]
(2) 3″ × 1¼” [e]
(4) 1¾” squares [f]
(8) 1⅛” squares [g]
(4) 1″ × 5½” [h]
Silo
(2) 2½” × 8¼” [i]
Heart
(4) 1¾” × 3″ [j]
[w] is 1¼” × 3¼” (not 3¾”)
Need the pattern cover Cutting instructions Image
Fabric Requirements
3 yards background country confetti white needs to be 3 1/4 yards
Page 2
Page 2 G (instead of 4 strips) cut 5 strips 2 1/2″ x WOF strips, cut into 80 instead of (32) 2 1/2″ squares
Page 2 of 4
From background fabric cut (4) 2 1/2″ not 3 1/2″ x WOF strips for inner border